When this issue occurs on your system, you’ll get the error message along the following similar lines.
How do I get VirtualBox to recognize my USB?
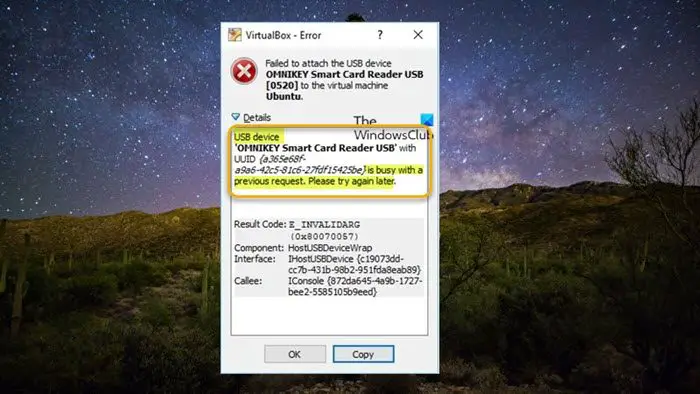
It is worth mentioning, you can configure VMware Workstation to add both USB 2.0 and USB 3.0. To get VirtualBox to recognize your USB device, within settings, browse to the USB tab and click the Add button on the very right of the window. Select the USB device that you wish to use from the list. Once done, click OK to save changes and exit. Now go back into your VM window, and from the Host options, select Device > USB Devices, then select the USB device that you want to access. If in VM Settings > USB, the Enable USB Controller option is greyed out, it’s likely due to the guest is running or in a saved state – fully shutdown the guest OS to restore the controls. USB device ‘OMNIKEY Smart Card Reader USB’ with UUID {a365e68f-a9a6-42c5-81c6-27fdf15425be} is busy with a previous request. Please try again later. Result Code: E_INVALIDARG (0x80070057)Component: HostUSBDeviceWrapInterface: IHostUSBDevice {c19073dd-cc7b-431b-98b2-951fda8eab89}Callee: IConsole {872da645-4a9b-1727-bee2-5585105b9eed} Read: VirtualBox Failed to attach the USB device to the virtual machine
USB device is busy with a previous request — VirtualBox error
If when you connect a USB device on a virtual machine that you have set up in VirtualBox on your Windows 11/10 host computer and you get the error message USB device is busy with a previous request, then our recommended and proven solutions in the order presented below can easily be applied to resolve the issue on your system. Let’s look at the description of the process as it relates to each of the listed solutions. Before you proceed, make sure you’re running the latest version/build of VirtualBox on your host machine.
1] Make sure the USB device is connected to the USB 2.0 port
Upon investigation regarding the USB device is busy with a previous request issue, you’re likely to encounter the problem as reported by some affected PC users if the USB device is connected to a USB 3.0 port on your computer. There is inbuilt support to add USB devices in VirtualBox. But that only supports USB 1.0 devices which are rarely in use anymore. On the contrary, newer versions of VMware support USB 2.0 and USB 3.0 devices out of the box. So, provided you have already downloaded and installed the VirtualBox Extension Pack that enables the support for USB 2.0 and USB 3.0 devices for not just flash drives but also other devices such as network adapters, hard disks, webcams, and more – if your computer has a USB 2.0 port, you can plug in your device to that port. Some affected PC users reported that the problem occurs only on the two USB ports attached to the same root hub. The USB device works fine on the third USB port, which uses a different host controller. Read: USB Composite Device is an older USB device and might not work
2] Modify the Windows registry, manually install the VirtualBox USB driver, & create a USB filter in the VM settings
This solution is a 3-step process that requires you do the following:
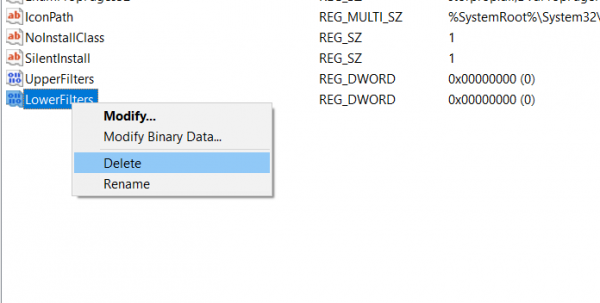
Modify the Windows registry by deleting the USB device Class UpperFilters/LowerFilters registry key.Manually install the VirtualBox USB driver.Create a USB filter in the VirtualBox VM settings
Now, let’s see a description of each of the steps. Delete the USB device Class UpperFilters/LowerFilters registry key
The UpperFilters registry key along with its sister key, the LowerFilters are add-ons added by third-party software during installation which help installed programs communicate with your device (system) drivers. Sometimes, some of the Device Manager errors you may encounter on your Windows 11/10 computer are caused by these filters. Since this is a registry operation, it is recommended that you back up the registry or create a system restore point as necessary precautionary measures. Once done, you can proceed as follows:
Note the Class UUID/GUID value for the USB device shown in the error prompt. In this case, it’s {a365e68f-a9a6-42c5-81c6-27fdf15425be}.Press the Windows key + R to invoke the Run dialog.In the Run dialog box, type regedit and hit Enter to open Registry Editor.Navigate or jump to the registry key path below. Substitute the USB-DeviceUUID/GUID placeholder with the value you identified earlier.
At the location, on the right pane, right-click on the UpperFilters value and choose Delete.Click Yes to confirm the action.Next, delete the LowerFilters value if it exists for the same GUID USB device class subkey.Exit Registry Editor when done.Reboot the computer.
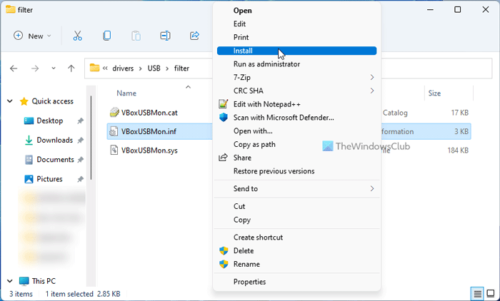
Read: The driver detected an internal driver error on \Device\VBoxNetLwf, Event ID 12 Manually install the VirtualBox USB driver
Once the computer boots after the completion of the first step above, press the Windows key + E to open File Explorer on your computer.Navigate to the directory path below:
At the location, right-click on the VBoxUSBMon.inf and select the Install option.Reboot the computer once the installation completes.
Read: How to install VirtualBox Guest Additions on Windows 11/10 Create a USB filter in the VirtualBox VM settings
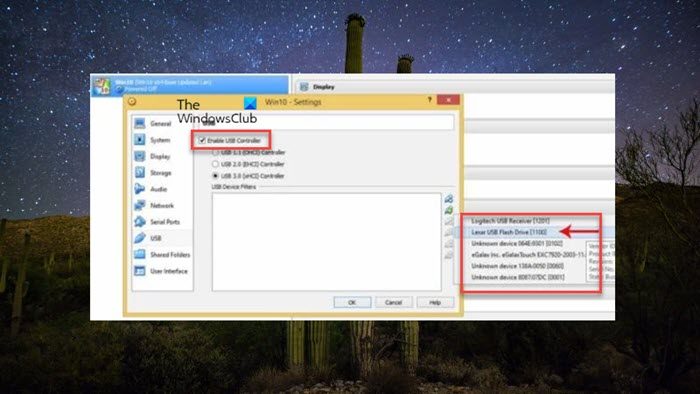
USB filters allow you to mount USB devices in VirtualBox VMs automatically. To create or setup or mount a USB filter in the VirtualBox VM settings, do the following:
Continuing after step 2 above, on boot, if the USB device that’s throwing the error in view is plugged into the computer, unplug it.Next, open and close VirtualBox. This action will remove the USB device from the VM’s seized list.Now, reconnect the USB device.Open VirtualBox and start the virtual machine.Right-click on the VM and go to the USB menu.Checkmark the USB controller option.Click on the “+” sign on the right side of the window to show a list of currently available USB devices.Click on the USB device that you want to automatically access inside VirtualBox.Click OK to confirm and exit.
From now on, if you plug in the filtered USB device, it will be automatically passed to the VirtualBox guest OS and won’t show up on the host OS.
How do I access the USB from VM?
With the VMware configured with a USB controller, you should have no issues connecting a USB device to the virtual machine. To access a USB device from a VM in VirtualBox, start your virtual machine, click VM > Removable device, then select the external USB hard drive you want to access and click Connect. Windows will now indicate the necessary software is being installed for your new USB hard drive. Once done, a new drive letter will be assigned to the USB device. To access the contents of the USB hard drive, open File Explorer and double-click the listed device. Now read:
Failed to create a proxy device for the USB device VirtualBox errorHow to fix VirtualBox USB not detected in Windows 11/10 computer